


DaVinci Resolve stands as Hollywood’s secret weapon for professional video editing, color grading, and audio mixing. Used on blockbuster films like “Dune” and “Top Gun: Maverick,” this powerhouse software offers the same tools as systems costing tens of thousands of dollars – completely free.
The learning curve appears steep, but breaking down the process into manageable steps transforms this industry-standard tool into an accessible creative platform. Whether you’re editing YouTube content or feature films, mastering DaVinci Resolve’s color grading and audio mixing capabilities opens doors to professional-quality results.
What You Need to Know
DaVinci Resolve combines multiple applications into one comprehensive package. The software divides into seven main pages: Media Pool, Cut, Edit, Fusion, Color, Fairlight, and Deliver. This guide focuses on the Color page for grading and Fairlight page for audio mixing – the two areas where DaVinci Resolve truly shines.
Your computer needs decent specs to run smoothly. Minimum requirements include 16GB RAM, a dedicated graphics card with 4GB VRAM, and substantial storage space. The software works on Windows, Mac, and Linux systems.
Download the free version from Blackmagic Design’s website. The paid DaVinci Resolve Studio version adds advanced features like noise reduction and collaborative tools, but the free version handles professional workflows without limitations.
Step 1: Project Setup and Media Import
Launch DaVinci Resolve and create a new project. Set your timeline resolution to match your source footage – 4K for 4K content, 1080p for HD material. Mismatched resolutions cause performance issues and quality degradation.
Access the Media Pool page and navigate to your footage folder. DaVinci Resolve works with virtually any format, including RAW files from professional cameras. Create bins to organize your media by scene, camera angle, or content type.
Import your footage by dragging files directly into the Media Pool or using the import button. The software automatically creates proxy files for smoother editing if your system struggles with high-resolution content.
Switch to the Edit page and build your basic timeline. Drag clips from the Media Pool to the timeline, performing rough cuts and basic edits. Don’t worry about perfect timing yet – focus on assembling your story structure.
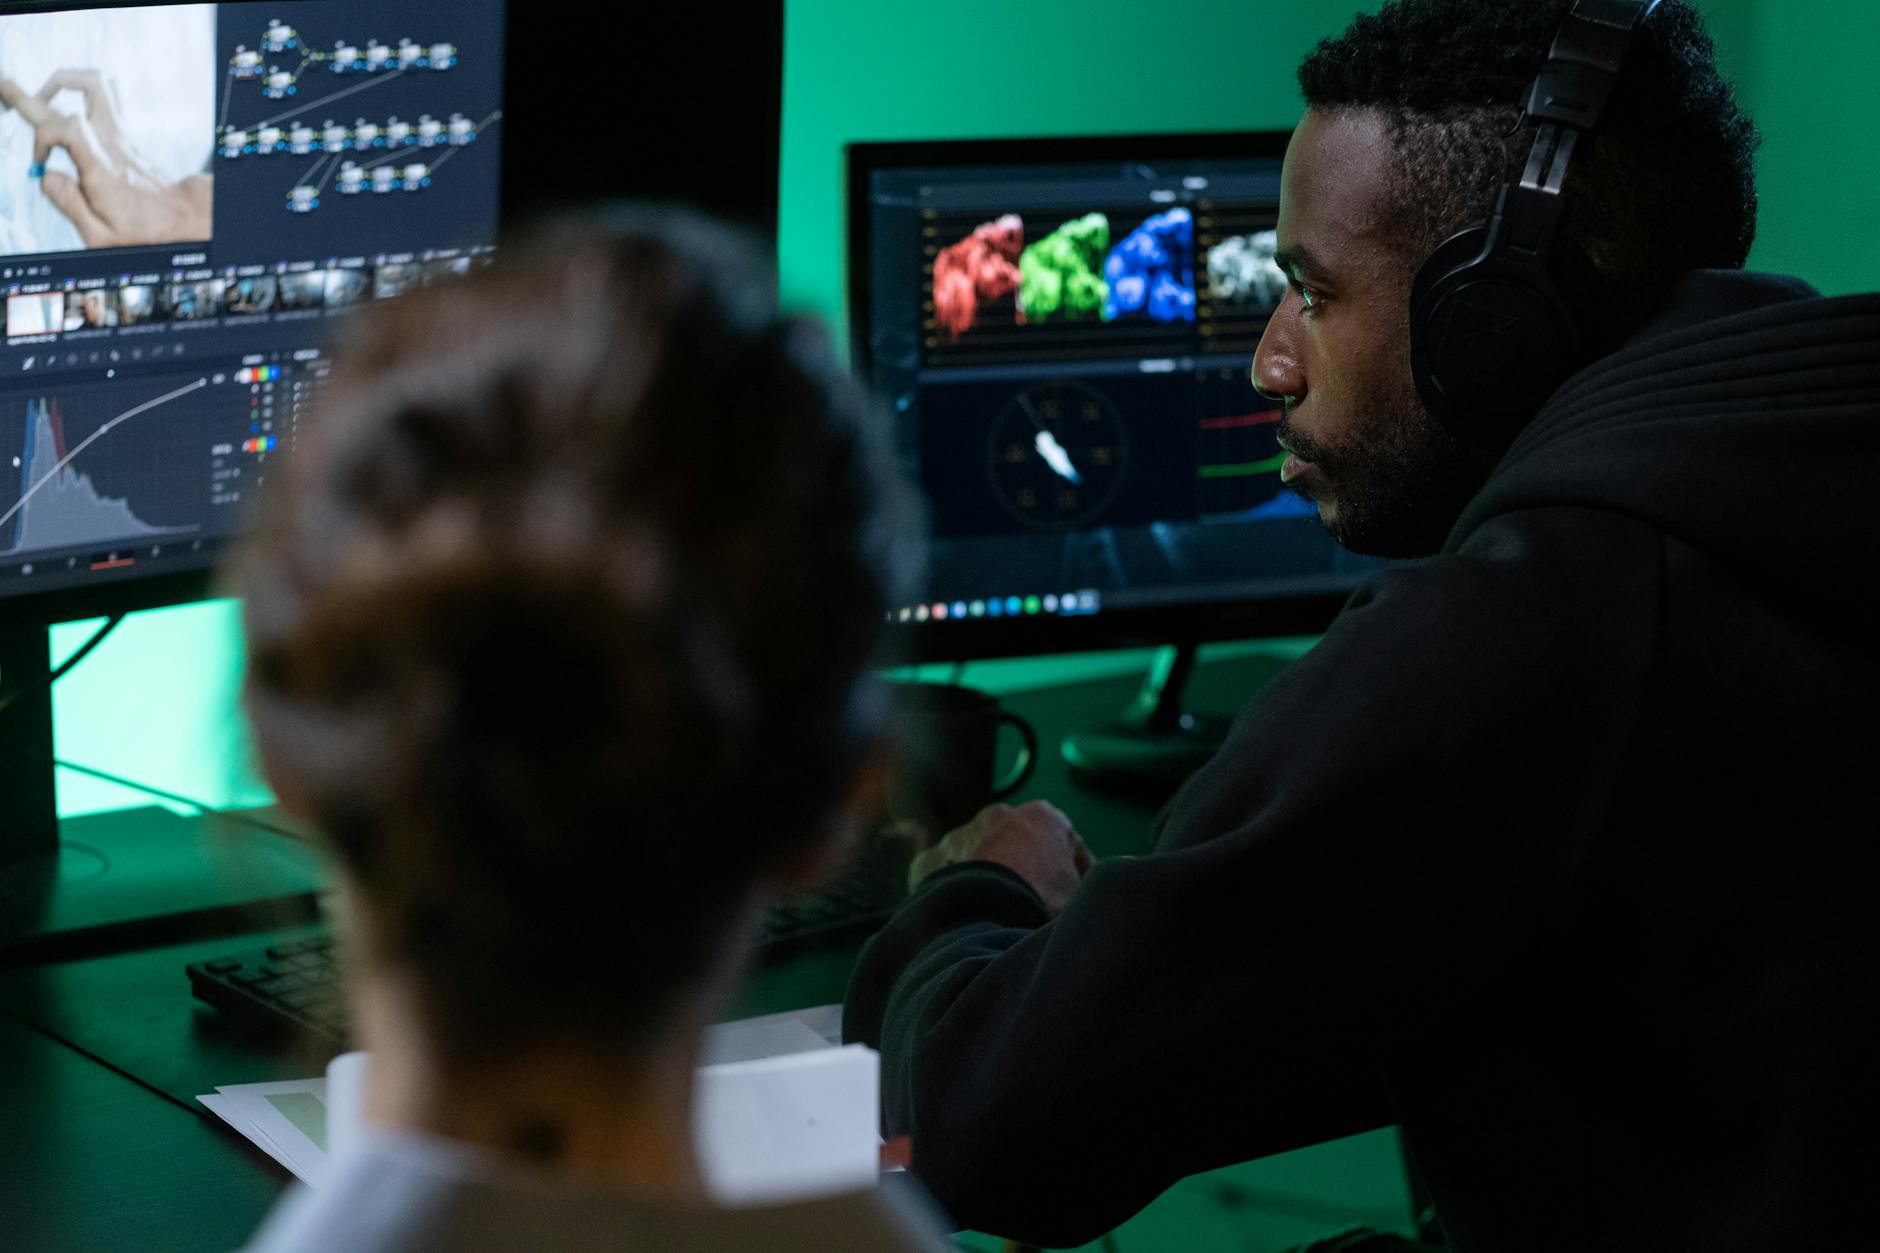
Step 2: Understanding the Color Page Interface
Navigate to the Color page where the magic happens. The interface divides into several key areas: the viewer shows your footage, the timeline runs along the bottom, and the control panels fill the right side.
The node graph appears in the bottom center – think of nodes as individual adjustment layers. Each node performs specific corrections or creative looks. Unlike traditional layer-based color grading, nodes connect in series, making complex adjustments more manageable.
Gallery thumbnails on the left store your favorite looks and corrections. You can apply these saved grades to other clips instantly, maintaining consistency across your project.
The scopes panel displays technical information about your image – waveform, vectorscope, histogram, and parade monitors. These tools ensure your footage meets broadcast standards and helps identify exposure or color balance issues.
Step 3: Primary Color Correction
Start with primary corrections – adjustments affecting the entire image. Select your first clip and examine the scopes. Properly exposed footage shows waveform peaks between 0 and 100 IRE units, with skin tones appearing in specific vectorscope regions.
Use the Lift, Gamma, and Gain controls to adjust shadows, midtones, and highlights respectively. The trackballs control color temperature and tint for each tonal range. Push shadows toward blue for cooler looks or orange for warmer feels.
Set your black and white points using the lift and gain wheels. Drag shadows down until you see pure black in the darkest areas, then raise highlights to achieve proper white levels without clipping.
Balance your footage using the temperature and tint controls. Daylight footage often needs warming, while tungsten-lit scenes require cooling. The auto-balance feature provides a starting point, but trust your eyes for final adjustments.

Step 4: Secondary Color Grading and Creative Looks
Add a second node for secondary corrections. Use the HSL qualifiers to isolate specific colors – select skin tones, sky blues, or foliage greens for targeted adjustments. The qualification preview shows selected areas in grayscale.
Power windows create geometric masks for localized corrections. Draw circles, rectangles, or custom shapes to brighten faces, darken backgrounds, or add spotlight effects. Feather the edges for natural-looking transitions.
Apply creative looks using the color wheels and curves. Film emulation LUTs (Look-Up Tables) provide instant vintage or cinematic feels. Load LUTs through the LUT browser or create custom looks using the RGB mixer and color warper.
Track moving objects using DaVinci Resolve’s built-in tracker. Apply a power window to a face or object, enable tracking, and the software automatically follows movement throughout the clip. This maintains consistent grading on moving subjects.
Step 5: Advanced Color Tools and Techniques
The qualifier tool isolates colors with surgical precision. Use the eyedropper to select specific hues, then adjust saturation, luminance, and hue ranges for perfect selections. Combine multiple qualifiers for complex isolation tasks.
Curves provide precise control over tonal relationships. The RGB curves adjust overall contrast, while individual red, green, and blue curves fine-tune color balance. Custom curves create unique looks impossible with basic controls.
The blur and sharpen tools add finishing touches. Subtle sharpening enhances detail without artifacts, while strategic blurring draws attention to key subjects. Use these effects sparingly – overprocessing destroys image quality.
Color matching ensures consistency between shots. Use the color match tool to analyze reference clips and automatically balance mismatched footage. This saves hours of manual adjustment when working with multiple cameras or lighting conditions.
Step 6: Introduction to Fairlight Audio Mixing
Switch to the Fairlight page for professional audio mixing. The interface resembles traditional mixing consoles with channel strips, faders, and effects panels. Audio tracks appear as waveforms with individual level controls.
Import audio separately or work with embedded track audio. DaVinci Resolve supports multichannel recordings and automatically syncs audio with video using timecode or waveform matching.
The mixer panel controls individual track levels, panning, and routing. Each track includes EQ, dynamics, and effects sends. Professional mixing requires understanding frequency ranges and how different elements occupy sonic space.
Audio meters display levels using broadcast-standard scales. Keep dialogue between -12dB and -6dB, with peaks never exceeding -3dB. These levels ensure compatibility with broadcast standards and streaming platforms.
Step 7: Essential Audio Mixing Techniques
Start mixing by balancing levels. Dialogue forms the foundation – ensure speech clarity before adding music and effects. Use the fader to set initial levels, then fine-tune using automation curves for dynamic scenes.
Apply EQ to enhance frequency response. High-pass filters remove rumble and handling noise below 80Hz. Boost presence frequencies around 2-5kHz for dialogue clarity. Cut muddy frequencies around 200-400Hz to clean up recordings.
Compression controls dynamic range and adds punch to recordings. Set moderate ratios (3:1 to 6:1) for dialogue, higher ratios for music and effects. Attack and release times determine how quickly compression engages and releases.
Add reverb and spatial effects using the built-in plugins. Room reverb places dialogue in realistic spaces, while delay effects create depth and movement. Match reverb characteristics to your visual environments for believable soundscapes.
Step 8: Final Mix and Delivery
Create submixes for different audio elements – dialogue, music, and effects on separate buses. This organization simplifies final level adjustments and provides flexibility during the mixing process.
Master bus processing adds final polish to your mix. Gentle compression and limiting ensure consistent levels across your entire program. EQ on the master bus should be minimal – fix problems at the source rather than the mix bus.
Monitor your mix on multiple playback systems. Professional monitors reveal mix problems invisible on computer speakers. Test on headphones, smartphone speakers, and television systems to ensure broad compatibility.
Export your finished project using appropriate delivery formats. DaVinci Resolve handles everything from social media uploads to broadcast delivery. The Deliver page provides presets for YouTube, Vimeo, broadcast, and cinema formats.
Like mastering other professional tools such as advanced 3D modeling workflows, becoming proficient in DaVinci Resolve requires consistent practice and experimentation with real projects.
Key Takeaways
DaVinci Resolve transforms amateur footage into professional content through proper color grading and audio mixing techniques. Master the node-based color workflow for maximum flexibility and creative control. Understanding scopes and technical standards ensures your work meets industry requirements.
Audio mixing requires attention to frequency balance, dynamic control, and spatial placement. Start with solid foundations – proper levels and clear dialogue – before adding creative elements. Professional results come from technical precision combined with artistic vision.
The software’s free version provides everything needed for professional work. Invest time learning the interface and workflow rather than upgrading immediately. Consistent practice with real projects builds expertise faster than theoretical study alone.
Frequently Asked Questions
Is DaVinci Resolve really free for professional use?
Yes, the free version includes all core features needed for professional color grading and audio mixing without watermarks or limitations.
What computer specs do I need to run DaVinci Resolve smoothly?
Minimum 16GB RAM, dedicated graphics card with 4GB VRAM, and fast storage are recommended for optimal performance.


